
I’m a little bit of a cheapskate, so when we moved to our new place in Rhode Island I was looking to repurpose as much furniture as possible.
It didn’t take long for me to realize that the dark stained furniture I’d had in Upstate New York wasn’t exactly matching the vibe of the airy bungalow in which we moved. With light blues, grays and whites pervasive through our new place, the dark furniture was distracting. Ugly, even. Something had to be done. I had to get creative because I wasn’t about to go out and buy all new furniture.
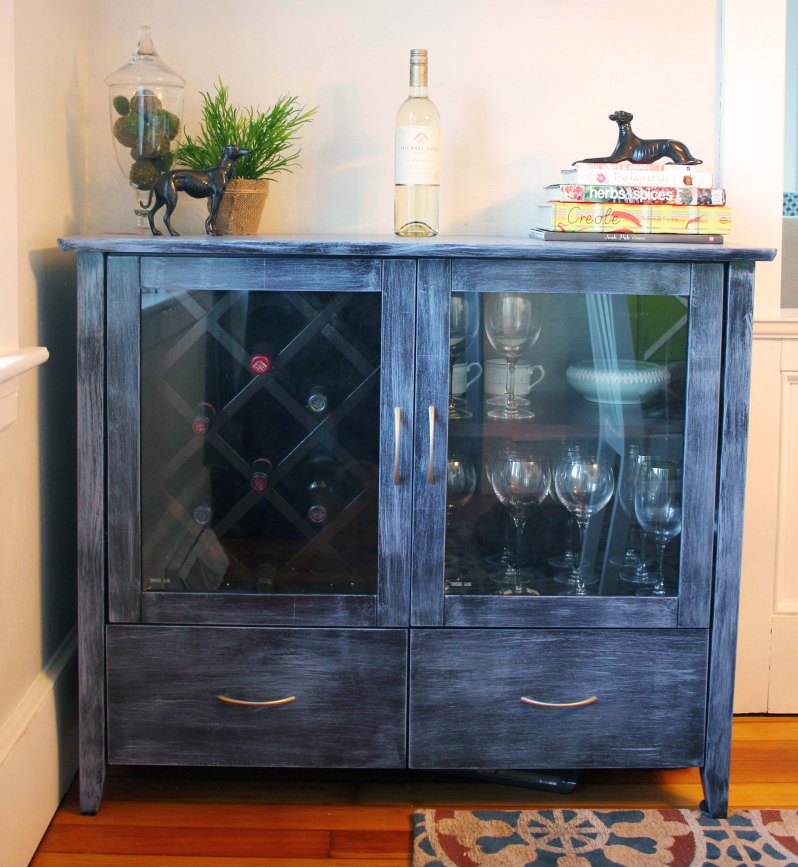
Enter this wine cabinet:

It was a piece I found particularly useful to store our crystal (and wine, of course!) and it fit perfectly into this little nook in our dining room. Its only downside was that it was way too dark against the white trim and it looked completely out of place.
So the obvious choice was that this cabinet was getting painted. The next question, however, was how? What color? You can see from the photo, I have a neutral gray wall with white trim. The rug is a mix of blue, cream, rust, and beige. The kicker? Not shown in this picture is the bright green sideboard on the opposite wall:

Yeah, that’s right. Lime green amidst shades of neutrality. The irony that I just said that dark brown was an unacceptable color for my house. Meh. I guess you can say I like color. In fact, I have no fear of vomiting ROY G. BIV all over my new home’s decor. That said, this lime green awesomeness created the biggest challenge on how I was going to paint the dark brown cabinet.
After much inner turmoil, my husband and I decided that it would be fun to have a piece of furniture that looks a little weathered. We would maintain some of the dark hues while still lightening it up to fit the cozy cottage theme of the house.
There’s one painting technique I discovered that gives the perfect weathered look: dry brushing. I’ve never dry brushed anything in my life; things here are either painted or stained. This was going to be a challenge.
What I needed to consider before painting this cabinet:
Laminate furniture doesn’t hold paint well unless you sand or prime it.
This was an issue in my case because I wasn’t planning to paint a solid coat over the entire cabinet. Therefore, priming this cabinet was not an option. Sanding was my next best option, but I was nervous that sanding it would take too much of the brown stain away and ruin the look we were going for.
Solution:
I took a medium-grit sanding sponge to the top of the cabinet that was a larger surface of stained hardwood. I worked with the grain just enough to rough up the finish a little, but not so much that it left behind the natural wood.
On the doors and the side I used a fine-grit sanding sponge to lightly rough up the surface of the wood. Again, I worked with the grain of the wood and was careful not to sand too much that I lost the dark stain.
I choose to work with a sanding sponge rather than sand paper or a palm sander because I feel like it allows for more control. You’re able to grip it and apply as much or as little pressure as needed without risking it slipping out from under you. Sand paper itself gives me that “fingernails on a chalkboard” cringe. I’ve found that if I’m not careful it slips easily from my hand. And, if that happens (as it has), before I know it I’ve sanded against the grain and left a notable gouge in the wood. No thanks. A palm sander is fun to use but like any power tool, sometimes there’s just too much power. Duh, right? Because this was a more delicate job and I was looking for the dark stain to shine through, I chose to go powerless.
Once I had sanded the entire cabinet save the back, I made sure to wipe it down with a damp cloth and let it dry until it was ready to paint. That took about 10 minutes.
Target furniture sometimes uses various wood product to make up one piece
The top of this cabinet is solid hardwood. The sides are particle board. I know from past experience that these materials accept paint differently, especially after it’s sanded. If I wasn’t careful with the application of the paint, I could be looking at a complete disaster.
Solution:
I went with the “less is more” approach when applying the paint to each surface of this cabinet. I painted the cabinet in layers of sorts – I put a little on, stood back, looked at it and went back in for more… or not.
The cool thing about dry brushing a piece of furniture is that it takes almost no paint at all to get the desired look. The biggest mistake I feared making was slapping on too thick a layer of paint. Then I’d be forced to forgo the dry brushed look entirely. And, since laminate and solid hardwood accept paint differently, I had to be extra careful.
So! To remedy that I grabbed a scrap board lying in my basement, a flat brush and my desired paint color. I dipped the tip of the brush into my paint color and then used the scrap board to remove almost all of the paint. Seems counterproductive, but trust me. It works. When the brush was mostly dry of pain, I applied the it to the cabinet. I was careful to make long, even strokes and keep the brush perpendicular to the cabinet. This maintained the consistency in the application of the paint.

One thing I learned quickly in this process that I didn’t think about before was that the paint would be heaviest at the point where you first apply it. That said, I recommend that you start in a new spot on your furniture every time you have to dip back into the paint can. I did that for the drawer here, and you can see exactly where I set my brush down. What you see here is the second “layer” of paint I applied:

Finally, I noticed right away that the paint on the laminate was thicker than the hardwood top. It’s just how it went on, not how I applied it. To combat that I grabbed my sanding sponge and sanded any area on the particle board that had too much paint.
Painted laminate furniture chips easily.
I learned this the hard way from my husband’s dresser I’d painted a year ago and never treated. Even when primed or sanded, paint on laminate furniture has a beautiful way of chipping off in the most inconvenient spots. It’s just the nature of the beast when the furniture is already finished when you decide to paint it again. It’s super important to make sure you treat the furniture before you concede that you’re done.
Solution:
Polyurethane. I decided a long time ago that I was not going to mess with chalk paints that require a wax coating on top. It is just personal preference. That, and the color choices for chalk paint are limited and it’s expensive. So, when I decided to use regular paint I also decided that I had to treat it so that the paint didn’t chip.
I used the Minwax Fast-Drying Polyurethane in clear satin shown here:

I applied it with a sponge brush after the cabinet was completely painted and dry. For this cabinet, I had to wait only a few hours. Despite that it’s “fast-drying,” the poly was still a bit sticky for hours after it was applied. It stopped being sticky about 12 hours later. To be safe, I waited a full two days before stacking anything on top of the cabinet.
In the end, the cabinet is exactly what I was looking for. It was a little bit weathered in look, but not antiqued. The dark brown still shone through the blue enough to give it depth, but not enough to distract from the otherwise light neutral decor.

Great tips on how to paint this!!! It looks awesome!! And….I know your not going to believe this but I have this exact wine cabinet from Target. Shocking. I know. Love, your life twin.
LikeLike
STOP IT. Shocker!! I think you should paint it… turquoise. Y’know. If you like that color and all. God we are the same person. I LOVE IT!
LikeLike